Membuat Efek Salju Dengan JavaScript

Your Ad Here

Mikum,,,
Kali ni gw mo share dikit tentang bikin efek salju pada blog ato web dengan menggunakan javascript. Tanpa panjang lebar lagi...
langsung aja ya...
  • Langkah Pertama
    • copy paste script di bawah ini.


    • Catatan : Pada kode var maxitems=25, Bisa kamu ganti dengan angka berapapun terserah. Kode itu untuk menentukan berapa banyak jumlah salju yang akan turun.

    • Jika Sudah tinggal masukan script diatas kedalam blog atau situs kamu.

    met mencoba...


    Read More - Membuat Efek Salju Dengan JavaScript

    Cara Daftar Google Adsense

    Your Ad Here

    Google Adsense adalah layanan PPC (Pay Per CLick) terbesar dijagad web, sudah banyak para blogger yang sukses dibisnis Adsense sebagai Publisher. Namun banyak blogger pemula yang kesulitan dalam daftar Google Adnsense, nah sekarang gw mo ngasih tau cara daftar Google Adsense biar di Approve.

    BERIKUT CARA DAFTAR ADNSENSE


  • Langkah Pertama


    • Bikin dulu email di google. Bila sudah punya email dari google. Selanjutnya masuk keDashboard Blogger kamu.


  • Langkah Dua


    • Setelah masuk keBlogger, kemudian ganti template atau themes blog kamu. Gunakan template yang clasic jangan yang standard.


  • Langkah Ketiga


    • Buat 10 postingan pada blog kamu dengan menggunakan bahasa Inggris, jika bingung dalam membuat postingannya Copas aja cari artikel yang sesuai dengan blog kamu di google. Asal isi dari postingan sesuai dengan tema pada blog kamu. Jangan sampe blog kamu tema tentang bisnis dimasukin postingan tentang info olahraga... hehehe Setelah selesai,,, lanjut kelangkah berikutnya.


  • Langkah Empat


    • Daftar Google adsense, klik disini.
    • Masukkin alamat situs/blog kamu di sebelah tulisan Website URL.
      contoh, http://bloggue.blogspot.com
    • Website Language, pilih yang English
    • cari tulisan kayak dibawah, dan centangin..
      I will not place ads on sites that include incentives to click on ads.
      I will not place ads on sites that include pornographic content.
    • Account Type, pilih yang Individual
    • Country, pilih Indonesia ato negara tempat tinggal kamu...
    • Payee Name, tulis nama lengkap kamu sesuai dengan yang di KTP.
    • Address line 1, tulis alamat rumah lengkap kamu sesuai dengan KTP.
    • Pada kolom Policies,centang aja semua kotak yang ada...
    • klik SUBMIT INFORMATION.
    • Cek email kamu, cari email dari Google Adsense Email Verification ato yang mirip2 gitu.
    • Buka & klik link konfirmasi yang dikirim oleh Google Adsense pada email kamu.
    • Selesai Sekarang kamu tinggal menunggu persetujuan dari pihak Google Adsense, kalo gak salah antara 1-2 hari. paling lama seminggu...

      Met mencoba deh..


    Read More - Cara Daftar Google Adsense

    Pengenalan Visual Basic 6.0

    Your Ad Here

    Sebelum mempelajari Visual Basic 6.0 kamu mesti punya programnya dulu, kamu bisa beli CD Visual Basic 6.0 atau bisa juga download di internet. Dengan Visual Basic kamu bisa membuat program berbasis desktop application dengan mudah, dari program yang sederhana sampai yang gila2an. Hehehe…

    Pada tutorial kali ini gw mau menjelaskan tentang Pengenalan Visual Basic 6.0, disini gw anggap kamu sudah punya program Visual Basic 6.0.

    Ok langsung aja, Langkah pertama silakan buka program Visual Basic 6.0. Maka akan mucul jendela seperti dibawah ini.


    Ada 13 jenis project yang bisa dibuat dengan visual basic 6.0, yaitu :

  • Standart Exe
    • Project standart exe adalaha project yang paling umum digunakan pada Visual Basic. Project jenis ini dapat menghasilkan file dengan extensi exe yang dapat dieksekusi secara langsung, juga dillengkapi dengan form.

  • ActiveX Exe
    • ActiveX Exe merupakan project yang digunakan untuk membuat komponen ActiveX yang bisa dieksekusi secara langsung.

  • ActiveX Dll
    • Project ActiveX Dll adalah project yang digunakan untuk membuat komponen ActiveX yang berupa DLL (Dinamic Link Library).

  • ActiveX Control
    • ActiveX Control adalah project yang digunakan untuk membuat komponen kontrol ActiveX, yaitu komponen yang dapat disipkan pada sebuah program aplikasi.

  • VB Aplication Wizard
    • Project VB Aplication Wizard merupakan project yang digunakan untuk membuat sebuah kerangka suatu program / software / aplikasi.

  • VB Wizard Manager
    • Project VB Wizard Manager biasanya digunakan untuk membangun sebuah wizard, yaitu kumpulan informasi dari pengguna yang akan digunakan untuk membangun sebuah aplikasi.

  • Data Project
    • Project jenis ini sangat identik dengan project Standard Exe, namun disini control yang digunakan untuk akses database langsung ditambahkan secara otomatis.

  • IIS Aplication
    • Sebuah project yang digunakan untuk membangun sebuah aplikasi pada IIS (Internet Information Server)

  • Addin
    • Dengan project Addin kamu dapat membuat Add-Ins baru.Add-Ins adalah sebuah perintah yang dapat ditambahkan pada menu Visual Basic.

  • ActiveX Document Dll
    • Project jenis ini dapat membangun sebuah Document Active dengan ekstensi file berupa DLL.

  • ActiveX Document Exe
    • ActiveX Document Exe hanpir sama dengan ActiveX Document DLL, namun format file yang dihasilkan berupa ekstensi Exe.

  • DHTML Aplication
    • DHTML atau Dynamic Hypertext Markup Language Aplication merupakan project yang dapat mempermudah kita dalam membangun halaman DHTML.

  • VB Enterprise Edition Control
    • VB Enterprise Edition Control pada dasarnya sejenis dengan project Standard EXE, bedanya kalau VB Enterprise Edition Control semua tools VB Enterprise Edition akan di aktifkan.


    OK segitu dulu ya pengenalan Visual Basic dari gw, ntar gw lanjutin lagi ma Tutorial Visual Basic lainnya...

    Read More - Pengenalan Visual Basic 6.0

    Tutorial Mengelola Blog Wordpress Part-2

    Your Ad Here

      Menulis Artikel Pada Blog Wordpress


  • Pada bagian post, klik add new untuk mulai menuliskan artikel. Pada kolom
    pertama isi dengan judul artikel.


  • Kemudian kolom yang berikutnya di isi denga isi artikel. Cara mengedit
    tulisannya ada dua macam. Visual untuk mengedit seperti word. HTML, untuk
    mengedit menggunakan kode HTML. Kita pilih visual aja yang lebih gampang.


  • Pada bagian categories, klik add new category untuk menambahkan kategori baru.
    Masukan satu atau dua kata yang mewakili maksud/ tema tulisan. Kategori ini
    fungsinya untuk mengelompokkan tulisan dengan tema yang sejenis. Jadi ketika
    menulis artikel, cek list pada kategori yang sesuai dengan tema artikel tersebut.
    Paren kategory artinya jika kita ingin membuat anak kategori, pilih kategori
    utamanya di bagian parent category ini. Setelah selesai, klik add.


  • Pada bagian discussion, ceklist Allow comments on this post untuk mengijinkan
    komentar pada tulisan tersebut.


  • Klik tombol ini untuk menampilkan fasilitas editing yang lebih lengkap.
  • Klik pada tombol-tombol berikut ini untuk memasukan
    gambar, video, musik, file, dan polling.


  • Gambar ini untuk membuat artikel di halaman depan terpotong. Jadi yang
    tampil hanya sebagian (ada tulisan read more atau selanjutnya >>). Caranya,
    letakkan kursor mousepada paragraf yang ingin di potong, klik tombol ini.


  • Klik tombol ini jika ingin mencopy tulisan dari word agar formatnya
    tulisannya tetap di pertahankan. Tapi kita tidak bisa memasukan gambar dengan
    cara mengcopy dari word. Gambar harus dimasukan dengan tombol no.32.


  • Selain cara ini, kita bisa langsung posting dengan fasilitas quick press, hanya saja
    pengeditan teks nya terbatas. Quick press ini ada di halaman depan administrator.


  • Untuk mengedit tulisan yang sudah kita buat, caranya masuk lagi ke bagian post,
    klik edit.


  • Akan tampil daftar artikel yang sudah kita tulis. Letakkan kursor mouse di atas
    judul artikel. Akan muncul Edit, quick edit, delet dan view. Klik edit untuk
    mengedit tulisan. Cara editnya sama seperti ketika kita membuat tulisan baru.
    Kalau sudah di edit klik update post. Kalau quick edit hanya untuk mengedit
    Judul dan kategorinya saja, bukan untuk mengedit isi tulisan. Kalau mau di hapus
    klik delete.


  • Klik stats untuk melihat jumlah klik/pengunjung ke artikel tersebut.


  • Setelah artikel sekarang kita akan menulis halaman. Pada bagian pages, klik add
    new. Kemudian, cara menulisnya sama seperti menulis artikel.


  • lalu apa bedanya? Kalau artikel akan ditampilkan dihalaman depan blog secara
    berurutan. Artikel baru akan diletakkan diatas artikel lama. Sedangkan halaman
    adalah tulisan yang sifatnya statis. Misalnya kita bisa membuat halaman ”tentang
    penulis” yang isinya biografi pemilik blog atau halaman ”tentang blog’ yang
    nantinya diisi penjelasan tentang apa tujuan dan isi blog.


  • Cara mengedit halaman, di bagian page klik edit. Sama juga dengan cara edit
    artikel.

  • Read More - Tutorial Mengelola Blog Wordpress Part-2

    Tutorial Mengelola Blog Wordpress Part-1

    Your Ad Here

    Setelah dulu w pernah menjelaskan tentang bagaimana ,membuat blog di wordpress, sekarang lanjut ke mengelola blog wordpress. Masa udah bikin blog tapi gak dikelola.?

    Kita mulai aja, tutornya.

    Langkah Pertama

  • login ke www.wordpress.com,
    isikan kolom username dan password dengan user dan password yang kita punya,
    kalu klik login.


  • Gambar di bawah ini adalah tampilan dari halaman admin wordpress kita. Dari sinilah kita mengelola blog.


    • Untuk mulai mengatur profil, lihat bagian users dan settings.

  • Pada bagian users, klik your profile.


  • Untuk mengganti bahasa pilih pada bagian Interface language.


  • Untuk mengganti gravatar (foto atau gambar yang akan menjadi identitas kita,
    semacam foto pada KTP aja) klik change your gravatar. Tunggu muncul jendela
    baru, klik Upload a new image from your computer untuk mencari gambar dari
    komputer. Klik browse, cari gambarnya, kalau sudah klik next.


  • Lakukan pemotongan gambar. Perbesar atau perkecil gambar yang diinginkan.
    Lalu klik crop and finish.


  • Pada bagian rate pilih G. Ini semacam rating. G artinya ”untuk semua umur”.
    Makanya pake gambarnya yang sopan, jangan yang 17+. Setelah itu tutup jendela
    dengan klik tanda silang di pojok kanan atas.


  • Setelah itu kita bisa mengatur ulang nama dan deskripsi tentang kita. Pada bagian
    Display name publicly as artinya nama yang akan tampil di blog ketika dibaca
    oleh orang lain.


  • Mau ganti password juga bisa di bagian new password.


  • setelah selesai klik update profile. Kalau ada pemberitahuan user updated artinya
    perubahannya sudah tersimpan.


  • Sekarang pada bagian settings, klik general. Blog Title atau judul blog bisa di
    ganti lagi.


  • Tagline ini semacam slogan yang ingin kita usung melalui blog yang kita punya.


  • Timezone untuk mengatur daerah waktu. Pilih UTC +7 untuk waktu WIB.


  • Date Format untuk mengatur format tanggal


  • Time Format untuk mengatur format jam


  • Kalau sudah klik save changes.


  • Kemudian masih pada settings, klik reading. Pada bagian blog pages show at most
    di isi dengan jumlah posting yang ingin kita tampilkan di halaman depan blog.


  • Kembali ke settings, bagian discussion. Cek list Allow people to post comments
    on the article untuk mengijinkan orang memberi komentar pada blog kita.


  • Comment author must fill out name and e-mail untuk mengharuskan yang mau
    memberikan komentar di blog kita agar mengisi email dan namanya.


  • Users must be registered and logged in to comment artinya yang mau komentar
    harus login ke wordpress dulu baru bisa nulis komentar


  • An administrator must always approve the comment artinya komentar yang
    masuk akan langsung ditampilkan, sedangkan Comment author must have a
    previously approved comment artinya komentar ditahan dulu menunggu
    persetujuan kita.


  • Avatar Display untuk menampilkan gravatar orang lain ketika komentar di blog.


  • Maximum Rating artinya kita bisa memilih, gravatar yang mau ditampilkan yang
    memiliki rating seperti apa.


  • Klik save changes

  • Read More - Tutorial Mengelola Blog Wordpress Part-1

    Raid Data Recovery

    Your Ad Here

    Therefore, the best action you can take in the situation of a Raid data recovery problem is to immediately send the hard disk to a specialized firm. Should a serious system failure occur, the whole pressure is transferred to the hard disk data recovery professionals. As the users are in the habit of starting troubleshooting processes in order to solve the problem, the data recovery experts must also repair the damage done by these processes, as they can make the data impossible to recover. The information involved in such a situation can cost many hundreds of thousands, possibly millions of dollars in labor and resources to create. This is the reason why the executives are not at all interested in finding out the cause of the failure, they just care about the fact that the server has crashed and that the problem must be immediately solved.

    It is true that the Raid data recovery process can be pretty expensive, but in most cases it is nothing compared to trying to recreate the data that has been destroyed. Not to speak about the fact that getting the data back could be enough to save someone's job!

    The procedures that Raid data recovery consists of start by making sure all of the drives are properly functioning. This may mean taking the physically damaged drives into the clean room and try to make all the necessary repairs, in order for them to normally function again. The hard disk data recovery technician then initiates a very low-level process that allows him to work around bad sectors of the disk. It is in fact making complete sector-by-sector clones of every drive. The original source drive is being put in a "write protect" mode, in order to protect the existing data during the cloning process. The actual recovery process is performed on these cloned copies!

    IT professionals have a lot of pressure placed on them when a catastrophic system failure occurs. It is their job to make sure that all systems are up and running. Many times, out of panic, troubleshooting processes are initiated in order to correct the problem. Often times these processes only make a bad situation even worse, and in many instances they can render the data unrecoverable. Let's keep in mind what this data can consist of in an average corporate environment. You are probably dealing with information that cost many hundreds of thousands of dollars in labor and resources to create. Much of the data probably can't be duplicated. The intellectual value alone could be in the many millions of dollars. Corporate executives really don't care to hear about how the failure occurred, or what unbelievable string of events led up to the server crashing. They don't care to hear the technical jargon as you try to explain to them what happened, and hope they understand that it wasn't your fault. They only want to know one thing..."why was this data not backed up, and how can we get it back?"

    Instead of taking chances on your own, call a data recovery professional. RAID data recovery can be expensive, but in most cases it is much less costly than trying to recreate the data that has been lost. There is a set procedure that most data recovery professionals follow when it comes to performing any recovery work. These procedures are followed and expanded upon when dealing with a RAID recovery. The first step of any RAID recovery is to make sure all of the drives are functional. In order to properly complete the recovery it is essential that all drives are fully functional (this is especially true with a RAID 0). This may involve taking any physically damaged drives into the clean room, in order to make the necessary repairs so that they function normally again. Once that is completed the next step is to make complete, sector-by-sector clones of every drive. This is not "Ghosting", but a very low-level process that allows the recovery technician to work around bad sectors, and have complete control over how the drive functions. During the cloning process, the original source drive that you sent in, is generally put in a "write protect" mode so that no data can be written to the drive. This insures that the original source data is not altered in any way.

    Once the cloning process is complete, the original drives you sent in are set off to the side and are no longer touched. The actual recovery process is performed on the cloned copies, so nothing that is done during recovery can make the situation worse. After the drives are cloned, they will be loaded into an emmulator and destriped. Destriping is like taking the scattered pieces of a puzzle and putting them together neatly. Simply stated, destriping is taking the data scattered among the multiple drives that make up array and placing it onto a single destination drive. From there we have a single drive in which we can complete what we would consider to be a "normal" recovery. We can complete this process even at the multi-terrabyte level. If the damage to the stripe is not too severe, in most cases a complete rebuild of the directory structure and all associated data can be completed.

    Read More - Raid Data Recovery

    Cara Daftar Blog Wordpress

    Your Ad Here

    OK kali ini saya akan menjelaskan tentang bagaimana cara membuat blog di Wordpress. Wordpress sudah tidaklah asing bagi para blogger, tapi mungkin untuk orang yang awam didunia blogging pasti akan sedikit aneh mendengar nama Wordpress. Saya jelaskan sedikit tentang Wordpress.

    Tentang Wordpress


    Wordpress adalah salah satu blog CMS yang dikembangkan oleh perusahaan Automattic.
    Wordpress pertama kali dikembangkan oleh Matt Mullenweg , Mike Litle, dan Michael Valdrighi dari platform b2 yang sekarang telah menjadi bbpress.
    Secara SEO, Wordpress sudah tak diragukan lagi karena dukungan layanan Ping-O-Matic. Fungsinya adalah memping balik blog-blog dengan engine Wordpress ke situs listing blog seperti Google Blog Search, Technorati, My Yahoo!, Weblogs.com. Sekarang wordpress sudah mencapai versi 2.8 yang diberi nama projek “Baker” dari nama seorang pemain trompet dan vokalis Chet Baker.

    Cara daftar Wordpress


  • Masuk ke www.wordpress.com
    * Klik Sign Up Now!

  • Masukan data yang di perlukan.
    * username adalah nama yang akan digunakan sebagai ID kita. Minimal 4 huruf.
    Hanya boleh huruf dan angka. Kalau ada peringatan Sorry, that user name already
    exist artinya username itu dah ada yang punya, cari lagi yg lain.

    * Masukan password yang diinginkan sebaiknya kombinasi antara angka dan huruf.
    Ulangi lagi pada bagian confirm. Pada bagian password strength itu untuk
    mengukur kekuatan password kita. Pendaftaran akan berhasil hanya jika password
    yang kita pilih minimal menunjukan good.


    * Cek list pada legal flotsam. Artinya kita menyetujui peraturan yang diajukan oleh
    wordpress.

    * Tandai Gimme a blog! Artinya kita meminta sebuah blog.

    * Klik Next.

    * Bagian blog domain, isinya akan sama dengan username. Ini yang akan jadi
    alamat blog kita. Tapi juga bisa beda sesuai keinginan kita.


    * Blog title di isi dengan judul blog.

    * Language pilih bahasa yang kamu mau.

    * Privacy di cek list. Artinya kita mau agar blog kita bisa tampil di google.

    * Klik Sign Up


  • Email sudah terkirim. Sekarang lengkapi profil kita.
    * Firs name di sini dengan nama depan.

    * Last name di isi dengan nama belakang.

    * About yourself di isi dengan deskripsi singkat tentang blog kamu.

    * Selanjutnya, cek email dari wordpress

    * Buka dan liat isinya. Klik link aktifasi dari wordpress. Yang seperti ini
    http://wordpress.com/activate/d3bfghhb55cd39

    * Setelah itu kita akan masuk ke halaman web yang menunjukan username dan
    password. Ada pemberitahuan Your account is now active yang artinya blog kita
    sudah bisa di gunakan. Selain itu kita juga mendapat email lagi yang berisi
    password dan username.

    * Klik login.

  • Read More - Cara Daftar Blog Wordpress

    Gamezine Premium Blogger Template

    Your Ad Here


    Gamezine Template Features:

    Free Professional style blogger xml template with a lots of Interactivity

    Video bar, Search box

    Java Script Slide Show, Read more option

    Java Script and CSS based menu

    Magazine Style blogger Xml template

    Professional content glider

    Java Script tab enable

    Content glider

    Video And News mini thumbnails

    Multi level drop down menu

    Best for game, news and entertainment site

    Search bar, Adsense ready

    Easily customizable

    Download Gamezine Template

    Live Demo

    Read More - Gamezine Premium Blogger Template

    Dreamy Premium Blogger Template

    Your Ad Here


    Features:

    Simple, organized, professional look, blue, minimalist blogger template 2009

    Gallery style main page

    Automatic summary (Expandable post) feature

    Automatic thumbnail of post images

    Cool CSS based Navigation Bar

    Custom comments, Blockquotes and Lists

    Suitable for entertainment, Photo gallery Portfolio blog

    Download Dreamy Premium Blogger Template
    Live Demo

    Read More - Dreamy Premium Blogger Template

    Portfolio Premium Blogger Template

    Your Ad Here

    Portfolio Template is a one page portfolio and a very clean template. It also has a smooth scroller to each menu of the page.


    Portofolio Template, Features :

    Professional Blogger xml Template 2009, 2 Column

    Dominated black, white, and blue color

    Java Script slide featured for showing your blog post

    Top vertical CSS based Navigation menu with a: hover effect

    Suitable for artwork, art folio, design portfolio blogs

    Expandable Post summary (Read More) enabled

    Search box ready

    Easy customizable


    Download Portofolio Template For Free

    Live Demo

    Read More - Portfolio Premium Blogger Template

    Video Marshanda Stress

    Your Ad Here

    pagi semua, bentar lagi sahur nih,,,

    Pada tau gak.? Marshanda gi naek daun loh...
    Sori sebelumnya, blog tentang web en blogger posting dunia gosip... hehehe...

    Kemarin nonton acara gosip, eh malah rame2 nya video tentang mantan gw ntu (Narsist mode on) Hehehe, yup tentang Video Marshanda yang bikin heboh dunia gosip indonesia. Di video berdurasi 3 menit ini, si ayank Marshanda agih mencela en ngomong gak jelas gitu ama temen2 SDnya dulu. Duh... Wat hepen wit yu Marshanda, Mai Darling...
    Satu lagi dia sambil nyanyi lagu SpaceGirl loh... Coba kalo lagu Ridho Roma pasti lebih rame tuh..
    hehehe...

    Kata dokternya sih dia sakit gitu, kasian banged....
    Pada penasaran gak mo liat videonya, tonton aja ni ada pilemnya di bawah ini. Ato kalo mo download silakan klik link dibawah ini. Moga aja Marshanda sakitnya gak lama2..

    Download Video Marshanda


    Read More - Video Marshanda Stress

    Total Posts, Comments Widget Blogger

    Your Ad Here

    Masuk ke Layout atau Elemen Halaman lalu klik Tambah Gadget link pada sidebar Anda di mana Anda ingin menambahkan widget ini. Bila jendela baru yang terbuka, pilih HTML / JavaScript sebagai widget dan tambahkan kode berikut dalam kolom isian Konten.

    <script style="text/javascript">
    function numberOfPosts(json) {
    document.write('Posts: <b>' + json.feed.openSearch$totalResults.$t + '</b><br>');
    }
    function numberOfComments(json) {
    document.write('Comments: <b>' + json.feed.openSearch$totalResults.$t + '</b><br>');
    }
    </script>
    <font color="blue"><script src="http://shevy-blog.blogspot.com/feeds/posts/default?alt=json-in-script&callback=numberOfPosts"></script>
    <script src="http://shevy-blog.blogspot.com/feeds/comments/default?alt=json-in-script&callback=numberOfComments"></script></font>


    Catatan :
    Ganti http://shevy-blog.blogspot.com/ dengan URL blog Anda sendiri. Anda dapat mengubah Posting dan Komentar: terserah anda, misalnya Anda bisa mengganti Komentar: dengan Jumlah Komentar:.

    Read More - Total Posts, Comments Widget Blogger

    Rollover Images in JavaScript

    Your Ad Here

    To do so is to copy or copy the JavaScript code below into your web pages. Then place it before the tag <HEAD>, or placed before the position of the image.

    <SCRIPT TYPE="text/javascript"> <!-- // copyright 1999 Idocs, Inc. http://www.idocs.com/tags/ // Distribute this script freely, but please keep this // notice with the code. var rollOverArr=new Array(); function setrollover(OverImgSrc,pageImageName) { if (! document.images)return; if (pageImageName == null) pageImageName = document.images[document.images.length-1].name; rollOverArr[pageImageName]=new Object; rollOverArr[pageImageName].overImg = new Image; rollOverArr[pageImageName].overImg.src=OverImgSrc; } function rollover(pageImageName) { if (! document.images)return; if (! rollOverArr[pageImageName])return; if (! rollOverArr[pageImageName].outImg) { rollOverArr[pageImageName].outImg = new Image; rollOverArr[pageImageName].outImg.src = document.images[pageImageName].src; } document.images[pageImageName].src=rollOverArr[pageImageName].overImg.src; } function rollout(pageImageName) { if (! document.images)return; if (! rollOverArr[pageImageName])return; document.images[pageImageName].src=rollOverArr[pageImageName].outImg.src; } //--> </SCRIPT>


    copy the code below again to put a picture on your pages.

    <a onmouseover="rollover('home')" onmouseout="rollout('home')" href="http://pcguru.okihelfiska.net"><img alt="PC Guru" src="http://www.okihelfiska.net/data/roll-out.png" border="0" name="home" /></a> <SCRIPT TYPE="text/javascript"> <!-- setrollover("http://www.okihelfiska.net/data/roll-over.png"); //--> </SCRIPT>


    Finished, Save your page, and then refresh.


    NB: This script will be problematic if used in the BLOG, should only be used on the Website only.

    Read More - Rollover Images in JavaScript

    Malaysia Klaim Tari Pendet Bali

    Your Ad Here

    Indonesia -- tarian pendet, Bali -- menjadi budaya mereka yang dicantumkan dalam iklan visit year mereka. Sebelumnya, mereka telah mengklaim angklung, reog Ponorogo, batik, Hombo Batu, dan Tari Folaya.

    Budayawan, Radhar Panca Dahana, mengatakan pengklaiman budaya Indonesia oleh Malaysia untuk kesekian kalinya merupakan kesalahan pemerintah Indonesia sendiri. "Ya tidak apa-apa lah, kita juga suka mengambil budaya lain untuk untuk promosi," katanya kepada Republika, Rabu (19/8).

    Ia menilai kecolongan budaya tersebut sebenarnya sebuah cermin atau refleksi. Ia menilai kita terluka dan malu, karena kita sadar sebagai pemilik kebudayaan itu kita tidak memperhatikannya. "Selama ini kebudayaan dipinggirkan, pemerintah dan masyarakat tak lagi peduli," ujarnya.

    Sedangkan negara lain, seperti Malaysia, kata Radhar, membutuhkan ekstensi kebudayaan, karena kebudayaan adalah senjata terbaik untuk diplomasi internasional. Potensi bisnisnya bagus. "Malaysia tahu mereka kekurangan budaya, mereka pintar melihat kebudayaan negara tetangganya, dan mereka menghargai budaya untuk mencari keuntungan, sedangkan pemerintah kita tidak peduli. Hanya peduli pada olahraga dan program lainnya," katanya.

    Untuk itu, kata Radhar, kedepannya agar Indonesia tidak kecolongan lagi, pemerintah harus perhatikan kebudayaan itu. "Kita majukan budaya kita supaya kita ada di depan, munculkan budaya kita dalam upacara-upacara, acara-acara, jangan lagu-lagu masa kini yang dinyanyikan oleh Presiden kita," tandasnya.

    Read More - Malaysia Klaim Tari Pendet Bali

    Install Joomla In Localhost

    Your Ad Here

    OK, here I will explain about How do I install Joomla on the server at localhost.

    1. You install the package apache Friends XAMPP in which it can be downloaded click here.
    package for windows, Linux for a click here to download.

    2. Then what if you have to install XAMPP, you all its good service ftpzila the apache, mysql.

    3. Then you download the Joomla package file download it here

    4. After you download the Joomla package is no package file extract it to a folder, ie: Joomla, Joomla folder and then you have a copy (for windows) to c: / program files / xampp / htdocs /
    For Linux you create a new folder eg: Joomla and then extract the package in your joomla
    / var / www / Joomla
    (folder that you created earlier), then change the file ownership is the way:

    root @ linuxku: / home / Nisa # cd / var / www /
    >root @ linuxku: / var / www # find / var / www / Joomla /-type
    d-exec chmod 755 () \;
    root @: / var / www # find / var / www / Joomla /-type
    f-exec chmod 644 () \;
    root @ linuxku: / var / www # chown-R www-data: wwwdata
    Joomla /


    5. Then you open your browser be it IE or mozilla, type
    http://localhost:80/Joomla (according to the folder you created earlier). Do not forget service apache
    mysql
    and run it on.

    6. It will appear:
    Press Next button, the display of Joomla License:

    7. Next click the More button, it will appear:

    contents Hostname: localhost
    My content Sql User Name: root
    empty password
    My SQL database contents Name is up for what you want, then click the Next button.
    it will appear as follows:


    8. fill in the name of the site you want to create eg situsku, and then click the Next button, it will appear as follows:
    fill in your email address, and change its password is, the others leave in the default situation.
    Then click the Back button Next, it will appear as follows:

    9. The sign suggests that this means that you have completed Joomla in the install, and then on the folder c: / program files / XAMPP / htdocs / Joomla (folder that you created) delete installation folder, then open your browser again and run it or type http:/ / localhost: 80/Joomla, if you want to customize your site you choose to stay administrator: input user name: admin and password that you have content at the time of earlier Joomla installation. And If you want to upload your Joomla to the internet you can use ftp fantatisco or whatever depending on where you are hosting what it provides. If you want to create a joomla site for free you can visit the www.freehostia.com, in the installation guide on the freehostia time, want to come home tired first. Happy to try and work.

    Read More - Install Joomla In Localhost

    Just News Great Blogger Template

    Your Ad Here


    Just News blogger template was new professional template Designed by NewWpThemes.com and has been bloggerized by Dhampire. Just News has 3 columns with right sidebar.


    Just News Template Installation :

    Setting Top Menu

    find code below and change it to your own.
    <div id="pagemenu">
    <ul>
    <li class="current"><a href="http://justnews-dhampire.blogspot.com/">Home</a></li>
    <li><a title="About" href="#">About</a></li>
    <li><a title="Our Mission" href="#">Our Mission</a></li>
    <li><a title="Contact Us" href="#">Contact Us</a></li>
    <li><a href="http://justnews-dhampire.blogspot.com/feeds/posts/default"><img style="margin: 0pt 2px 0pt 0pt; vertical-align: middle;" src="http://i25.tinypic.com/2q24g0n.png"/> RSS Feed</a></li>
    </ul>
    </div>


    Setting second menu bar i Just News Template

    Change it with your own link and titles
    <div>
    <ul id="nav">
    <li class="current"><a href="http://justnews-dhampire.blogspot.com/">Home</a></li>
    <li><a title="title" href="#">Browsers</a></li>
    <li><a title="Computers" href="#">Computers</a></li>
    <li><a title="EDIT ME" href="#">EDIT ME</a></li>
    <li><a title="EDIT ME" href="#">EDIT ME</a></li>
    <li><a title="EDIT ME" href="#">EDIT ME</a></li>
    <li><a title="EDIT ME" href="#">EDIT ME</a></li>
    </ul>
    <div class="nosubcategories">
    </div>
    <ul id="subnav">
    <li><a href="#">Subnav</a>
    </li><li><a title="EDIT ME" href="#">EDIT ME</a></li>

    </ul>

    </div>


    Setting 468x60 ads on top.

    find code below and change to your own banner.
    <a href="http://flashden.net?ref=pluswebdev"><img src="http://themeforest.net/new/images/ms_referral_banners/468x60_FD.jpg"/></a>

    Banner's 125*125
    <a target="_new" href="#"><img src="http://clixpy.com/clixpy_banner.php?size=125x125&file=125x125-1.gif" class="ad125"/></a>
    <a target="_new" href="#"><img src="http://themeforest.net/new/images/ms_referral_banners/TF_125x125.jpg" class="ad125"/></a>
    ><a target="_new" href="#"><img src="http://themeforest.net/new/images/ms_referral_banners/GR_125x125.jpg" class="ad125"/></a>
    <a target="_new" href="#"><img src="http://themeforest.net/new/images/ms_referral_banners/VH_125x125.jpg" class="ad125"/></a>

    Read More - Just News Great Blogger Template

    Adsense In Single Posts Blogger

    Your Ad Here

    I was recently optimizing Adsense on one of my Blogger sites and decided I wanted to place Adsense inside the posts – but only on single posts, not on the home page or in the archives. Here’s how.


    Why Blogger?


    Although my primary blog platform is WordPress, I do occasionally use Blogger for some side projects. Why? Go and read everything that Grizzley’s written on his Make Money Online For Beginners site. Blogger can be an excellent option. It’s free, easy to create a site, can scale to handle massive traffic etc.


    The only downside to Blogger is the limited ability to customize the site. With WordPress I can change pretty much anything I want. With Blogger I can only change things within the narrow framework that Blogger allows. In this case, I ran into the limitations with the built-in options to display Adsense ads.

    Blogger’s Built In Options To Display Adsense


    The easiest way to add Adsense to a Blogger blog is via the built-in gadget. I won’t go through the whole process, as it’s written about elsewhere, but you can add an Adsense gadget in the same way you can add a Profile gadget, Text gadget, Poll gadget, etc. Just go to Layout, then Page Settings, then click on Add a Gadget, select the Adsense gadget and then configure it.


    The first time you use it, Blogger will ask you for your Adsense publisher number and link the blog to your Adsense account. Then you simply decide where you want the gadget to appear, what size and colour the ads should be and you’re off! You’re ready to start making money online.


    You can also add Adsense between posts. To do this, click Edit on the Body gadget and turn on the Show Adsense Between Posts option. You’ll then be presented with the same options that the gadget gives you (size, colour etc).

    Limitations With Built-In Options


    There are several limitations to using Blogger’s built-in Adsense gadget:


    1. Can’t Put Adsense Ads Within Posts


    The main limitation with using the built-in Adsense gadget is that you can’t place ads within a post. You can add them before posts, after posts, between posts, in the sidebar, but not in the actual post.


    It’s well known that the CTR (click through rate) is higher for ads within a post than for ads in other positions. So putting Adsense within a post will make more money for you. I cover how to do this below.


    2. Can’t Use Channels


    Another limitation of the built-in Adsense gadget is that you can’t use channels to track the performance of ad units.


    However, this isn’t really a limitation – if you want to use channels, simply create your code on the Adsense site, then copy and paste your Adsense code into a JavaScript gadget, instead of using an Adsense gadget. In all other ways it will work the same as the Adsense gadget.


    3. Blogger Only Shows Three Ad Units


    The last limitation is only an issue for those people who place an Adsense unit in the sidebar. Some people choose not to do this, but I find that an Adsense unit in the sidebar performs relatively well (not as good as units at the top of the page, but better than those lower down the page).


    The problem is that Google makes sure that only three ad units are displayed on a Blogger page, as per their Terms Of Service. Great in general, but it means you have less control over which ad units appear. Unfortunately the sidebar is rendered last in most templates, so it’s one of the units that disappear if there are too many units on the page.


    This won’t happen on the single post page. However, if you display ads between posts (or within posts) then the sidebar ad unit will disappear on pages with multiple posts, such as the home page and archive pages. I explain how to overcome this below.


    Adsense Within Posts


    As I mentioned above, you can’t place Adsense ads within the post body using the built-in gadgets. To do this, we’re going to have to put our Adsense code directly into the template.


    We still can’t put the ad unit in the middle of the post, but we can put it at the top of the post, below the title, with the text wrapping around it. Great! That’s proven to be the most effective placement, so that’s exactly what we want.


    Now, the technique used to do this isn’t new. In fact I learned how to do it by reading Bonnie Calhoun’s Wrapping Adsense in Blog Post. You can go and read her post for the full instructions, but here are the basic steps:


       1. Get your Adsense code from the Adsense website

       2. Parse the code to replace special characters with HTML entities

       3. In Blogger, go to Layout, then choose Edit HTML

       4. Make a backup of your template by clicking Download Full Template

       5. Click Expand Widget Templates

       6. Search for <data:post.body/> or <p><data:post.body/></p>

       7. Place your Adsense code on the line immediately above this

       8. Save the template


    Note 1: It’s very important to parse the code as per Bonnie’s site (ie replace < with &lt; and > with &gt; etc). If you do not do this, your Adsense units will not display correctly and you risk being banned by Google.


    Note 2: You probably want to place your Adsense code within a floating div, so that the text wraps around it.


    Here’s what the code will look like (with the publisher specific information removed). The first and last lines should already exist in the template, the rest is what you’re adding.


    <div class='post-body entry-content'>

    <div style='float: left;'>

    &lt;script type=&quot;text/javascript&quot;&gt;&lt;!--

    google_ad_client = &quot;pub-xxxxxxxxxxxxxxxx&quot;;

    google_ad_host = &quot;pub-xxxxxxxxxxxxxxxx&quot;;

    google_ad_slot = &quot;xxxxxx&quot;;

    google_ad_width = 336;

    google_ad_height = 280;

    //--&gt;

    &lt;/script&gt;

    &lt;script type=&quot;text/javascript&quot;

    src=&quot;
    http://pagead2.googlesyndication.com/pagead/show_ads.js&quot;&gt;

    &lt;/script&gt;

    </div>

    <p><data:post.body/></p>


    This solves the problem of getting Adsense to appear within the post, driving up CTR. However, the sidebar unit will still disappear on the home page, as there will be more than 3 units on the page (one embedded in each post).

    Only Showing Adsense In Posts On A Single Post


    To solve the problem of the sidebar unit disappearing, I decided that I only wanted to show Adsense within the post (ie solution in the previous section) on single posts. I didn’t want this ad unit to appear on the home page or on archive pages.


    It would be easy enough to do this in WordPress / PHP, but I had no idea how to customize a Blogger template. I consulted Blogger’s Help facility and found a list of Layouts Data Tags, which let me see what could be done. Despite the options being fairly limited, I found the answer I needed: The pageType tag, which can have a value of ‘item’, ‘archive’ or ‘index’.


    My XML coding skills are a little rusty, but thankfully it wasn’t hard to work out how to include some HTML based on the type of page:


    <b:if cond='data:blog.pageType == "item"'>

    PUT YOUR CODE HERE

    </b:if>


    This says: If it’s a single post, include the HTML (obviously you have to put it in). So single posts (pageType of item) will display the HTML, but the home page (pageType of index) and archive pages (pageType of archive) will not.


    Applying this to our Adsense problem, here is the full code you need (with the publisher specific information removed). Use this instead of the code in the Adsense Within Posts section above. The first and last lines should already exist in the template, the rest is what you’re adding.


    <div class='post-body entry-content'>

    <b:if cond='data:blog.pageType == "item"'>

    <div style='float: left;'>

    &lt;script type=&quot;text/javascript&quot;&gt;&lt;!--

    google_ad_client = &quot;pub-xxxxxxxxxxxxxxxx&quot;;

    google_ad_host = &quot;pub-xxxxxxxxxxxxxxxx&quot;;

    google_ad_slot = &quot;xxxxxxxxxx&quot;;

    google_ad_width = 336;

    google_ad_height = 280;

    //--&gt;

    &lt;/script&gt;

    &lt;script type=&quot;text/javascript&quot;

    src=&quot;
    http://pagead2.googlesyndication.com/pagead/show_ads.js&quot;&gt;

    &lt;/script&gt;

    </div>

    </b:if>

    <p><data:post.body/></p>


    Of course, this means that only two Adsense units will be shown on the home page. If you’re doing things properly, most of your visitors should arrive on single posts, via the search engines, so this solution’s good enough for me.

    Final Thoughts


    If you want to make money online and you’ve decided that using Adsense on Blogger is the way to do it, then optimize it!


    Hopefully this has helped you a) increase your CTR by showing you how to place Adsense units at the top of your posts and b) how to preserve income from the sidebar unit by stopping it from disappearing on multiple post pages., Internet, blog, Download, Twitter


    Read More - Adsense In Single Posts Blogger

    Mortagage Note Buying Versus Rehabbing Homes

    Your Ad Here

    As any seasoned real estate investor knows, just because you acquire property that is cheap does not mean it won’t become expensive. Things happen that are not conducive to our investment timetable or budget, and often they are beyond our control.


    Sometimes rehabbing a home takes longer than anticipated. Or the cost of materials and labor can rise unexpectedly, local ordinances can change, or other scenarios can come into play to make a project run longer than scheduled or over budget – or both. And many of the circumstances dictating how things unfold may be impossible to foresee. Weather can play a critical role, for instance, especially if you are doing roof repairs, concrete work, or exterior painting and need the help of sunny skies. When hurricanes and other natural disasters strike, even on the other side of the country, construction materials can suddenly become more expensive – the price of plywood can jump 20 percent overnight.


    Many projects are now on hold simply because of a rise in gasoline prices, which adds to the cost of all materials delivered by truck to the local lumberyard or home improvement store. It can even add to labor costs, because if your contractors are commuting, they expect to be compensated for the cost of getting to and from the job site. If you are working on a slender margin, a few cents per gallon at the gas pump can be enough to erase your potential profits while you work to rehab and “flip” a property.
    And any delay in a real estate project leaves the investors open to vulnerability from shifting economic factors. If the housing market cools off and interest rates spike before you get your house on the market and sold, for instance, you can be left holding the bag through the downturn, with expenses like mortgage payments, insurance premiums, and property tax added to your balance sheet.


    To find an alternative way to invest in real estate


    – without the day-to-day logistical headaches


    – many investors turn to paper investment,


    either as a way to supplement their portfolio or as a full-time business in lieu of actual physical ownership of properties. By buying the debt that finances real estate, they participate without having to roll up their sleeves and deal with the nitty-gritty details of rehab work. And without financing, you aren’t a buyer, you’re just a browsing looker, so those who invest in the loans that fuel projects will always be in demand, as long as there is a market for buying and selling property.


    Especially in times like these


    – when the real estate market is challenged by steadily rising interest rates


    mortgage note investors can earn substantial yields, taking advantage of the higher rates. And those who have prior experience as real estate investors can use their knowledge of property to help choose sound, secure, credit-worthy investments. If the building that serves as collateral on the note is valuable, then the debt carries less risk, and those who are accustomed to rehabbing property usually have an eye for what constitutes solid and problem-free construction.


    As with any debt instrument, when investing in real estate mortgages there are different rates of return, yields, timetables to maturity, and degrees of risk versus potential reward. To learn more about investing in mortgage notes, contact a broker who specializes in them. They can explain how it works and how it can serve as a practical alternative to rehab projects to help you stay invested in real estate, during both bull and bear markets.


    Troy Fullwood, self made millionaire, nationally known investor, real estate guru, speaker and coach; would like to share with you creative ways to building your own “Money Tree.” In 1997, Troy founded a company called Pinnacle Investments. Back then, his main focus was primarily based on buying first lien performing and non-performing commercial and residential real estate notes. However, with the ever changing industry, Troy has begun to refocus his attention toward providing investors with the tools they need to build a successful real estate portfolio. For over eight years, Troy has been whole heartedly involved in the real estate industry. Troy is an investor himself, he has bought and rehabbed homes, purchased rental properties, purchased land, and is currently working on building custom homes and commercial office space.


    Read More - Mortagage Note Buying Versus Rehabbing Homes

    Business Talk Free Blogger Template

    Your Ad Here


    This is a great blogger Template. Business Talk is simply and premium blogger template for blog about business, loan, and finance. If you like this template, you can download now for free.

    Download :
    http://yodroo.com/templatecontent/blogger/Business-Talk.zip

    Read More - Business Talk Free Blogger Template

    Viluxus Free Blogger Template

    Your Ad Here


    Viluxus is a deluxe template. It has a serious dark background which gives the template a professional spirit. Also it's wide post area is great for photoblogging and portfolios. It is a very organized template, really neat.

    Features:
    * Minimalistic
    * White, Gray
    * Highlighted Author Comments
    * Easy to customize
    * Custom Welcome Message feature
    * Fast Loading

    Download :
    http://www.box.net/shared/sksltdf4fu

    Demo :
    http://viluxus-demo-dantearaujo.blogspot.com/

    Read More - Viluxus Free Blogger Template

    Photoplus Free Premium Template

    Your Ad Here


    Photoplus is a great theme for photographers that want to use Blogger as a portfolio. It is really a premium template. I came up with this idea after looking trough the feedback I get from you guys. Many people ask me to create templates like this, and here is one more. This template has a premium jQuery feature called FullSize to show up a bigger version of each photo.
    This template is for photography only, so if you need to show texts or anything else, It will not work.

    Features:

    * Photography
    * jQuery Special Feature
    * Web 2.0
    * Easy to customize
    * 3 Column Footer

    Download :
    http://www.box.net/shared/2hvkuuxq1h


    Demo :
    http://photoplus-demo-dantearaujo.blogspot.com/

    Read More - Photoplus Free Premium Template

    TURNOUT MAG Free Premium Template

    Your Ad Here


    Over the last few days, so many readers commented on this site asking me to convert a Magazine style wordpress theme to Blogger version... So, for all you guys.. Releasing Premium Magazine style Blogger Template "TURN OUT MAG". This was originally a wordpress theme designed by ChiQ Montes and I converted it to Blogger version.

    The template comes with so many built in features including:
    » Thumbnails on homepage (automatic)
    » Two main columns on the Homepage (Mag style)
    » Banner ad / Adsense ready
    » 468 x 60 px Banner ad on the header
    » Three Columns
    » Search Box
    » SEO Optimized
    » "Read More.." (automatic summarize)
    » Featured Video
    ...and many more...

    Demo :
    http://turnoutmag.blogspot.com/

    Download :

    http://sites.google.com/site/farisviosite/template/template-magazine.zip?attredirects=0

    Read More - TURNOUT MAG Free Premium Template

    JomSocial Pro 1.2.206

    Your Ad Here


    Famous Joomla component of building social networks, not nuzhnayuschiysya introduction.

    Archive: component | Modules | Plugins | Instructions
    Demo:http://www.jomsocial.com/community.html
    Previous version of JomSocial v.1.2.204


    Download :
    http://rapidshare.com/files/265313015/JomSocial_v.1.2.206.rar

    Read More - JomSocial Pro 1.2.206

    JB Captify Contentv1.2 Template

    Your Ad Here


    The captifyContent module is a slick new way to display sections ,categories or content on your site visually. The module resizes the image that you have assigned to the section, category or content, lays it out in a simple flat layout and then the captify script generates the sliding or fading effect that displays the title of the section, category or title.

    Demo : http://showcase.joomlabamboo.com/jul09
    Download : http://www.joomlabamboo.com/downloads/free-extensions/view-category


    Download :
    http://rapidshare.com/files/265056474/JB_CaptifyContent_J1.5_v1.2_unzip_1st.zip

    Read More - JB Captify Contentv1.2 Template

    Free Elevate2 Joomla Template

    Your Ad Here


    Template name: Elevate2
    Copyright Business:JoomlaBamboo
    Version of the application: Joomla 1.5.x
    Live Demo:http://showcase.joomlabamboo.com/jun09

    A root of our popular template Raise Elevate2 coming. Artists, healers, alternative service providers (in fact, anyone seeking a simple, uncluttered interface) is drawn to this beautiful model.

    Elevate2 Tableless Joomla 1.5.x template that makes it easy to manage, develop and internationalize your shop, blog, website or gallery. Comes with a custom template for the amazing new blog template plugin called Super Works by Blogger, a new version of our module and jTweet two new modules. The gallery module prettySlider have your cellphone pictures and discoloration at any time while the display module captifyContent site sections and categories, like nothing before.

    Subtle smoke and indicated with 46 background borders unite! module positions to create a serene yet powerful package to delight your audience.
    Features

    * templatetemplate only
    * Super Blogger template
    * New module prettySlider Gallery
    * New module captifyContent
    JQuery Superfish Suckerfish Menu *
    * JQuery accordion as a menu panel
    * 10 different backgrounds Smokey
    * 10 different color options logo
    * 7 color options hilite
    * Extensive template overrides
    * Late jQuery PNG Fix for IE6
    * Simple typography
    * Requires Plugin Library JB
    * 46 Module Positions
    * All the scripts run jQuery in no way conflict.
    * PSD files included full source code
    * XHTML and CSS valid
    Browser Compatibility

    We tested this template extensively in IE6, IE7, FF 2.0 (Mac and PC), Safari 2.0 (Mac) 3.0 (Mac and PC), Opera, Camino.

    Package Contents
    Joomla 1.5 Native template
    Joomla 1.5 Quick Start Package
    Source PNG files

    Module Positions
    There are a total of 46 positions in this module Joomla template.

    Download:
    http://rapidshare.com/files/266842732/JBboeleva2te.rar

    Read More - Free Elevate2 Joomla Template

    RT AfterBurner Joomla Template

    Your Ad Here


    RT Afterburner - Free Joomla 1.5 Template
    Demo:
    http://demo.rockettheme.com/?template=afterburner

    Afterburner is the fastest Joomla template ever and is completely free. The theme balances speed and search engine optimisation with a full feature set. The template is based on the standard SEO layout used in club templates, and is therefore fully dynamic and collapsible.


    An assortment of 8 preset styles, both light and dark also accompany the templates.

    * Speed Optimisation
    * SEF Optimised Layout
    * Advanced Colour Selection
    * Suckerfish Dropdown Menu
    * 8 Preset Styles - Light / Dark Variations
    * 18 Module Positions
    * FF3.5, Opera 9.6, Safari 4, IE6,7,8 Compatible
    * W3C XHTML 1.0 Transitional. W3C CSS 3 Valid

    Download:
    http://rapidshare.com/files/267179604/RT_Afterburner.rar

    Read More - RT AfterBurner Joomla Template

    Simple Shop Joomla Template

    Your Ad Here


    Simple Shop is the easiest cart in Joomla! Simple Shop combines the best features of Joomla! and the simple shopping cart Foxycart!

    This Joomla template was remixed from JoomlaBamboo's Simple Shop template.

    Features

    Awesome Inspiration from JoomlaBamboo

    Remixed from JoomlaBamboo
    - Integrate with Foxycart
    - Harness the simplicity and power of Foxycart using the free Foxycart Joomla!
    - Integrator from JoomExtend
    - 11 Module Positions
    - Module Positions to suit your needs.

    Custom Width

    - Make your site your way with a custom width parameter. Choose a pixel (px) value or percentage (%).

    - 1, 2, or 3 Columns

    - Quickly change from Left/Right, 2 Left, or 2 Right columns.

    - Choose Font Family for Body & Headings

    - Choose from Arial, Times New Roman, Georgia, and Courier New.

    - Custom Font, Link, and Link Hover colors

    - You choose the colors of the body font color and/or link and link hover colors.

    - SimpleShop Full Package (2.44 MB)

    Content File :
    jp_simpleshop.zip
    mod_foxycartBasket_j1.5_v1.0.1.zip
    simpleshop_source.zip

    Download
    http://rapidshare.com/files/267542561/jp_simpleshop.zip

    Read More - Simple Shop Joomla Template

    Free Restaurant Joomla Template

    Your Ad Here

    Template name: Restaurante
    Copyright Business : Shape5
    Version of the application: Joomla 1.5.x
    Live Demo:http://www.shape5.com/demo/restaurante/


    Great joomla template.
    We designed Restaurante to install a set of components and the model that will allow any small restaurant to take orders online at their website. Give your shop a more professional features with the online order that this model gives you freedom.

    This model also includes a theme that VirtueMart is extensively modified to suit a restaurant online. We also bring the basket and S5 column AJAX functionality. New this month IE6 is a plugin that will notify users update their browser.


    Features:
    * 100% tableless CSS

    * Valid XHTML

    * CSS Validation

    * Joomla 1.5 only

    * SQL dump available

    * 23 module positions

    * New! S5 Column Cart AJAX
    * New! IE6 Upgrade Plugin

    * Module changes: S5 with google map, standard VirtueMart Login

    * VirtueMart Domain Included

    * Sliced PSDSs included

    * Site Shaper (demo quick to install)

    * Fully collapsible module positions

    * S5 Effects scripts powered

    * Set 2 background images

    * Lytebox permit

    * Tool Tips enabled

    * 4 Menu systems: No-MooMenu Drop Down, No-MooMenu Fading, No-Scroll Down MooMenu or Suckerfish

    * Custom page and column widths


    * Compatible with the following browsers:
    o IE6 +

    o Firefox 1.5 +

    o Opera 9 +

    o Safari

    o Netscape

    o Advant

    o Chrome


    Menu Styles:

    Suckerfish Menu:

    This menu is a Suckerfish menu system and is disabled by default but if you prefer to enable it, you can set the menu to “2″ in the “configuration model.” In Joomla 1.5 will have the option within the parameters of the model.

    No. S5-MooMenu dropdown menu:

    The S5 does MooMenu Drop Down Menus completely powered by S5 effects of your modules and components will not cause any conflicts using this menu system. Simply mouse over the top menu in the demo and you will see the menu without expanding SUCKERFISH in.

    You do not want this fancy menu? No problem, you can switch to the standard menu system SUCKERFISH in the model configuration or completely hide the menu altogether.

    No. S5-MooMenu Fading Menu:

    The S5 does MooMenu Fading Menu is completely powered by S5 Effects your modules and components will not cause any conflicts using this menu system. Simply mouse over the top menu in the demo and you will see the menu without SUCKERFISH fade in

    You do not want this fancy menu? No problem, you can switch to the standard menu system SUCKERFISH in the model configuration or completely hide the menu altogether


    Download :
    http://rapidshare.com/files/268623374/Restaurante_July09.zip


    Read More - Free Restaurant Joomla Template

    Cara Daftar Paypal

    Your Ad Here

    Paypal itu adalah semacam bank online kita di dunia maya. Hampir semua bisnis di internet menggunakan paypal untuk pembayarannya. Jadi jika kita ingin mengikuti bisnis online, seperti mengikuti paid review, PTC, dan jual link itu harus punya Paypal dulu, biar bisa dapet bayaran dari bisnis online. OK langsung aja,


    Cara Daftar Paypal :


    1. Masuk ke situs Paypal di http://www.paypal.com/


    2. Klik Sign Up Today untuk mendaftar.


    3. Selanjutnya ada pilihan negara, karena anda di Indonesia pilih Indonesia. Lalu pilih tipe account paypal yang anda inginkan sesuai kebutuhan, saran saya pilih type Premier aja... biar pajaknya kecil.


    4. Selanjutnya masukan informasi anda seperti Email, Nama, Alamat, Telp. Pastikan Nama, Alamat, Telp yang anda isi untuk pendaftaran sama dengan data kartu kredit kita, ini jika ingin verifikasi dengan kartu kredit.


    5. Setelah semua proses diatas selesai kita akan menerima email konfirmasi dari Paypal bahwa kita telah mendaftar dan untuk mengaktifkan account Paypal, buka email dari Paypal tersebut dan klik link konfirmasi yang terdapat didalamnya, untuk konfirmasi bahwa kita adalah pemilik email tersebut


    6. Selesai, kita coba login dengan alamat email kita tadi. Untuk saat ini kita sudah memiliki account Paypal, hanya saja statusnya masih belum diverifikasi. Paypal yang belum diverifikasi sudah bisa digunakan untuk transaksi maksimal $100 setelah itu kita tidak bisa menggunakannya lagi.


    Untuk cara verifikasi Paypal ada 2 macam,


    - Pake Credit card, Kita musti punya kartu kredit dulu... A.K.A Ribet...


    - Pake CVV, singkatan dari virtual credit card,


    Read More - Cara Daftar Paypal

    Cara Install XAMPP

    Your Ad Here

    XAMPP merupakan sebuah paket instalasi untuk PHP, APACHE dan MySQL. Dengan menggunakan XAMPP, kita tidak perlu lagi repot menginstall ketiga software itu secara terpisah. XAMPP dapat di download di

    http://www.apachefriends.org/en/index.html.

    Berikut ini adalah cara menginstall XAMPP.

  • Jalankan file xampp-win32-1.4.12-installer.exe (atau versi lainnya)


  • Kemudian akan tampil pilihan untuk memilih bahasa ketika proses instalasi XAMPP berjalan. Silakan pilih  bahasa Indonesian atau English.

    Cara Install XAMPP

  • Proses instalasi akan dimulai. Klik Next untuk memulainya.


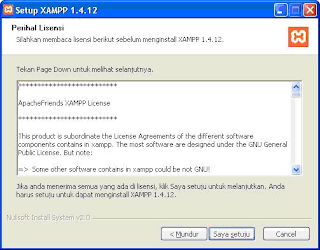
  • Akan muncul lisensi software. Silahkan membacanya jika anda mau, tetapi saya lebih suka untuk tidak membacanya karena terlalu banyak. Klik Saya Setuju / I Agree untuk melanjutkan.


  • Cara Install XAMPP

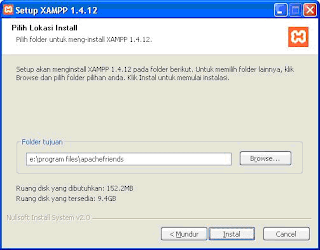
  • Selanjutnya silakan anda pilih lokasi install untuk XAMPP. Kemudian klik install


  • Cara Install XAMPP

  • Tunggu beberapa saat sampai proses instalasi selesai.


  • Jika proses installasi XAMPP telah selesai, Langkah selanjutnya adalah menjalankan servicenya.


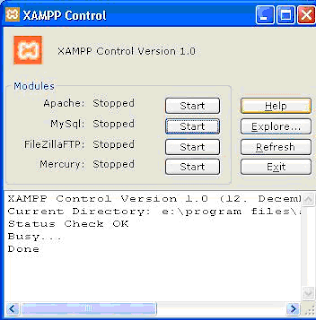
  • Jalankan XAMPP Control Panel yang ada di desktop. Atau anda juga dapat menjalankan XAMPP Control Panel dari menu Start -> All Programs -> apachefriends -> xampp -> xampp control panel.


  • Cara Install XAMPP

  • Nyalakan Apache dan Mysql dengan mengklik tombol Start. Buka web browser anda, lalu ketikkan http://localhost. Jika tampilannya seperti di bawah ini, maka apache sudah terinstall dengan benar.

  • Met Mencoba deh...

    Cara Install XAMPP

    Read More - Cara Install XAMPP